📑 Table of Contents
📋 Summary
You can set up a backyard drop stitch pool in 30–60 minutes (plus water fill time). Success hinges on level ground, good drainage, correct PSI, and enough clearance. Skip these, and you risk collapse, voided warranty, or early failure.
🔑 Key Points
- Pick a flat, solid surface — concrete or compacted earth work best.
- Plan drainage before you place the pool — water build‑up causes settling.
- Match pool size to your yard — leave at least 1.5m (5ft) clearance all around.
- Keep inflation within the recommended PSI (typically 5–12 PSI).
- Check local fencing laws — many areas require 48‑inch barriers for pools over 24″ deep.
- Don’t forget filtration — it’s not optional for pools used more than a day or two.
| Factor | Residential | Resort / Hotel | Rental Business |
|---|---|---|---|
| Installation time | 30–45 min | 1–2 hrs | ~1 hr |
| Ground prep effort | Medium | High | Medium |
| Drainage importance | Important | Critical | Important |
| Filter required? | Recommended | Required | Recommended |
| Seasonal removal | Common | Less common | Frequent |
| Custom branding | Optional | Popular | Popular |
Why Proper Setup Matters More Than You Think
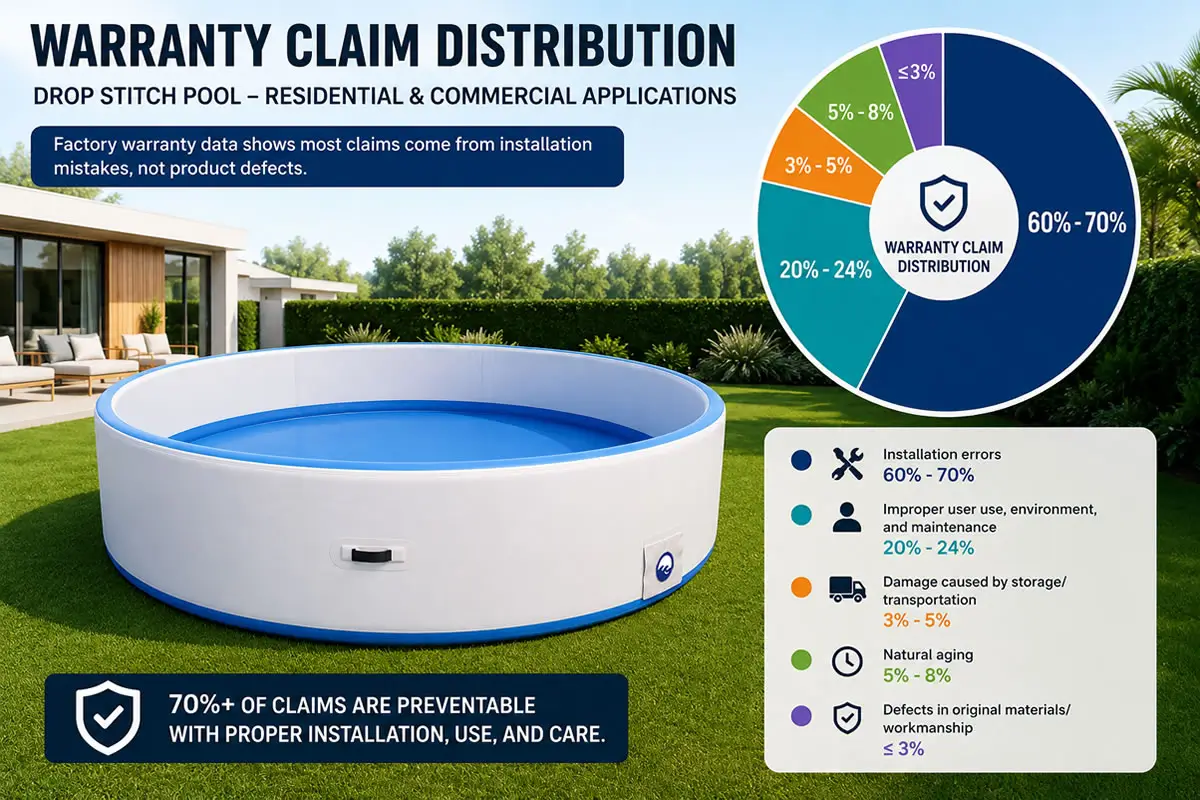
Most pool failures come from installation mistakes, not bad materials. Factory warranty data shows 60–70% of claims trace back to setup errors. That’s not a guess — it’s what we see year after year.
Manuals from brands like Bestway and Intex warn clearly: “Setting up on uneven ground voids the warranty.” So if you skip leveling or forget a ground sheet, you’re on your own when something goes wrong.
Common mistakes that trigger complaints
The big ones: uneven ground, wrong PSI (too high or too low), no drainage, and not enough clearance around the pool. Also, many buyers ignore the need for a protective mat. That leads to punctures from hidden stones or roots.
Why performance depends on setup
Drop‑stitch pools rely on internal polyester threads — at least 6,500 threads per m² in good‑quality products. These threads keep the walls rigid, but only if the pressure is right. Level ground and even water filling also matter. Get any of these wrong, and the walls bulge, crease, or stress‑crack.
Factory experience: most warranty claims are setup‑related
We’ve processed hundreds of returns. The top causes: ground settling after filling (wall misalignment), valve damage from high‑pressure compressors, and deformation from pressure swings. These are all avoidable — if you follow the manual.
How bad setup shortens pool life
A well‑installed pool can last 3–7 years with normal seasonal use. But a sloppy install? You might get one summer — or less. Ground punctures, seam separation, and over‑inflation cracks are the main killers. Invest an extra hour in prep, and you add years to the product.
Evaluate Your Backyard Before You Buy
Measure twice, order once. The pool’s footprint isn’t the only number you need. You also need clearance, access, and ground conditions. Do this check before you spend any money.
Measure available space correctly
Measure the length and width (or diameter) of the pool itself. Then add at least 1.5m (5ft) on every side — for walking, filter access, and safety gear. For a 4m round pool, you’ll need a yard of about 7m × 7m. Rectangular pools (like 20ft × 10ft) give you more usable surface for games.
Minimum clearance around the pool
Leave 1m (3.3ft) of walkway for maintenance. Also account for the filter pump, ladder, and any deck furniture. Some local codes demand 1.5m from property lines — check your city’s rules.
Access routes for delivery and install
Can you get the box through the gate? Is the water hose long enough? Do you have a GFCI outlet within 10–15m of the pool site? Think about these logistics ahead of time. For big commercial pools, you may need a truck with a lift gate.
Ground types: which ones work best?
Not every surface is safe. Never install on gravel, sand alone, asphalt, or chemically treated soil. Here’s a quick reference:
| Surface | Rating | Notes |
|---|---|---|
| Concrete pad | Excellent | Most stable; use a protective mat |
| Wood deck | Good | Must support the weight (check structure) |
| Artificial grass | Good | Add a ground sheet underneath |
| Natural grass | Acceptable | Must be levelled; grass will die |
| Gravel | Not recommended | Puncture risk, uneven |
| Sand only | Poor | Settles unevenly under water weight |
Selecting the Right Pool Size
Don’t shop by “capacity” alone. User numbers are often inflated. You need to balance space, water volume, wall height, and how you’ll use it.
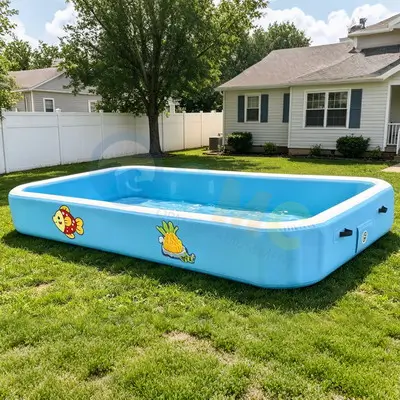
Small family pools (2–4m diameter)
These fit tight backyards. Depth is usually 50–70cm. They hold 2–4 people. Less water means less stress on the ground and quicker setup. Great for kids and casual cooling.
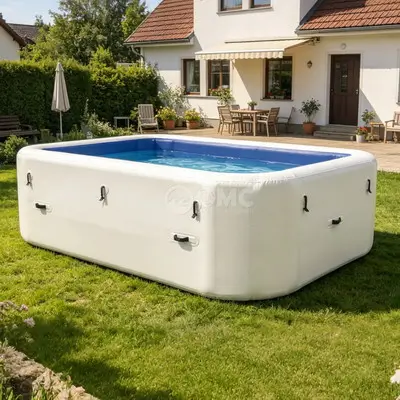
Medium entertainment pools (4–6m)
The most popular residential size. Fits 4–8 people. Wall height is often 70–100cm. Requires more ground prep and a stronger filter. Ideal for family gatherings and short‑term rentals.
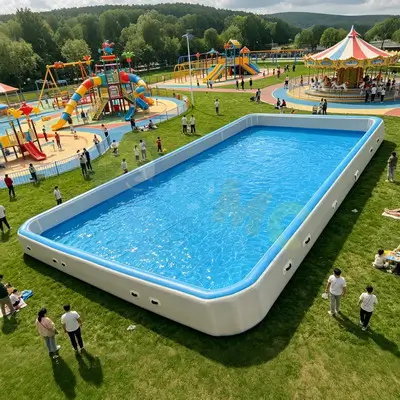
Commercial‑grade pools (6m+)
Used in resorts, hotels, and large event rentals. They need professional installation, heavy‑duty materials, and commercial filtration. They can handle 10+ users. Budget for site engineering and ongoing maintenance.
Depth changes installation demands
Deeper walls (≥70cm) mean higher hydrostatic pressure. You’ll need more robust ground prep, higher PSI, and stronger pumps. Safety rules also get stricter — many jurisdictions require fencing for pools over 24″ deep.
A common mistake: buying by capacity only
“Fits 6 people” is marketing speak. Actual usable space depends on wall height and shape. A 4m round with 70cm walls holds about 8,800 litres. A rectangular pool of similar footprint can hold much more. Always check water volume and floor area.
Ground Preparation Checklist
This is the single most important step. A solid foundation prevents collapse, voided warranties, and early failure. Do it right, and the rest is easy.
Clear the site
Remove every stone, twig, root, and sharp object. Extend the cleared area at least 0.5m beyond the pool. Grass will die underneath — that’s normal, but you can put down a barrier to keep it from rotting.
Level the ground
The surface must be dead flat. Slope tolerance is 1–2% (1–2cm per metre). Dig down high spots — never fill low spots. Filled areas settle unevenly. Use a spirit level and check multiple directions.
Protective ground sheet
Always put a protective mat (PVC, geotextile, or purpose‑made pad) between the ground and the pool. It stops punctures from residual debris and adds insulation. Cost: $50–200 — cheap insurance.
Plan drainage
Water will collect around the pool if you don’t direct it away. Slope the ground 1–2% away from the pool. For problem areas, install French drains or gravel channels. Commercial sites often need engineered drainage.
Electrical needs
Filter pumps need a GFCI‑protected outdoor outlet within cord reach (10–15m). Avoid extension cords — they overheat. For commercial jobs, hire a licensed electrician for a dedicated circuit.
- Slope ≤ 2% (checked with level)
- All sharp objects removed
- Protective mat down
- Drainage route confirmed
- GFCI outlet nearby
- Water hose reaches
- Tools ready (pump, gauge, tape)
Step‑by‑Step Installation Process
Follow this sequence, and you’ll avoid 90% of common mistakes. Total active time (excluding water fill) is about 30–60 minutes.
- Unpack & inspect — Check every part. Look for shipping damage, seam flaws, and valve function. Let the PVC warm in the sun for 1–2 hours — it becomes more flexible.
- Position the pool — Unroll it exactly where it will stay. You cannot move it once filled — water weight makes that impossible.
- Connect the inflator — Use a high‑volume, low‑pressure pump with a gauge. Never use a shop air compressor — it can blow seams.
- Inflate to the target PSI — Check your manual. Typical ranges: 5–8 PSI (small), 6–10 PSI (medium), 8–12 PSI (large commercial). Don’t guess — use a gauge.
- Verify shape — Walls should stand vertical and uniform. No bulges, wrinkles, or wavy edges. Adjust pressure now, before water goes in.
- Hook up the filter — Connect hoses and prime the pump. Check for leaks before you fill the pool.
- Fill slowly — Keep an eye on the walls as water rises. Do not leave the hose unattended. Stop at the marked fill line — overfilling can cause collapse.
- Final safety check — Confirm all valves are sealed, the filter runs, and water level is correct. Look for leaks or odd sounds.
| Task | Time |
|---|---|
| Unpacking | 5–10 min |
| Positioning | 5 min |
| Inflation | 10–20 min |
| Filter setup | 10–15 min |
| Water fill | 1–6 hrs (depends on pressure & size) |
| Final inspection | 10 min |
Inflation Pressure Management
PSI is not a suggestion — it’s a structural requirement. Too low, the walls bow out. Too high, seams crack. And temperature changes mean you need to adjust seasonally.
Recommended PSI by pool size
Manufacturers typically specify:
| Pool type | Recommended PSI |
|---|---|
| Small (2–4m) | 5–8 PSI |
| Medium (4–6m) | 6–10 PSI |
| Large commercial (6m+) | 8–12 PSI |
Risks of under‑inflation
Walls sag outward, reducing water volume. They also develop folds and creases — stress points that weaken over time. The pool becomes unstable, especially with active users.
Risks of over‑inflation
Seams and valve attachments stretch too far. Hard creases form — these are weak spots. In cold weather, over‑inflated PVC can crack like glass. Stay within the range.
Seasonal adjustments
Heat expands air; cold contracts it. A pool that’s perfect at 8 PSI in the morning might hit 10 PSI by afternoon. Check PSI weekly during use. Reduce a little on hot days; top up when it cools.
Factory specs for long life
Quality drop‑stitch fabric uses 500D polyester with tensile strength of 4,800–5,600 N/5cm. The internal threads (≥6,500 per m²) need steady pressure to keep walls rigid. Follow the manual, and the material stays strong for years.
Filtration, Water Treatment, and Utilities
Clean water isn’t optional. Plan your filter, chemicals, and drainage before the pool arrives. Retrofitting is messy and expensive.
Choosing the right pump
Match pump flow to pool volume:
- Small pools: 1,000–2,000 L/hr
- Medium pools: 3,000–6,000 L/hr
- Commercial: 6,000+ L/hr
Cartridge filters are common for residential use; sand or DE filters are better for high‑traffic commercial setups.
Circulation needs
Turn over the entire pool volume once every 4–6 hours. Run the pump 8–12 hours/day for residential; commercial pools often run 24/7. Use a timer to automate.
Chemical treatment
Chlorine, bromine, or saltwater systems all work. Drop‑stitch PVC is chemical‑resistant, but always follow the manufacturer’s limits. Test water 2–3 times a week. Keep pH 7.2–7.6, free chlorine 1–3 ppm.
Drainage and seasonal removal
Know where the water will go — sewer, storm drain, or yard. Some cities restrict pool water discharge. Use a submersible pump for fast draining; gravity drains are slower but work.
Residential vs. commercial maintenance
Residential: weekly chems, monthly filter cleaning. Commercial: daily testing, weekly filter servicing, and often a professional contract. Commercial pools need stricter record‑keeping for liability.
Safety Considerations – Non‑Negotiable
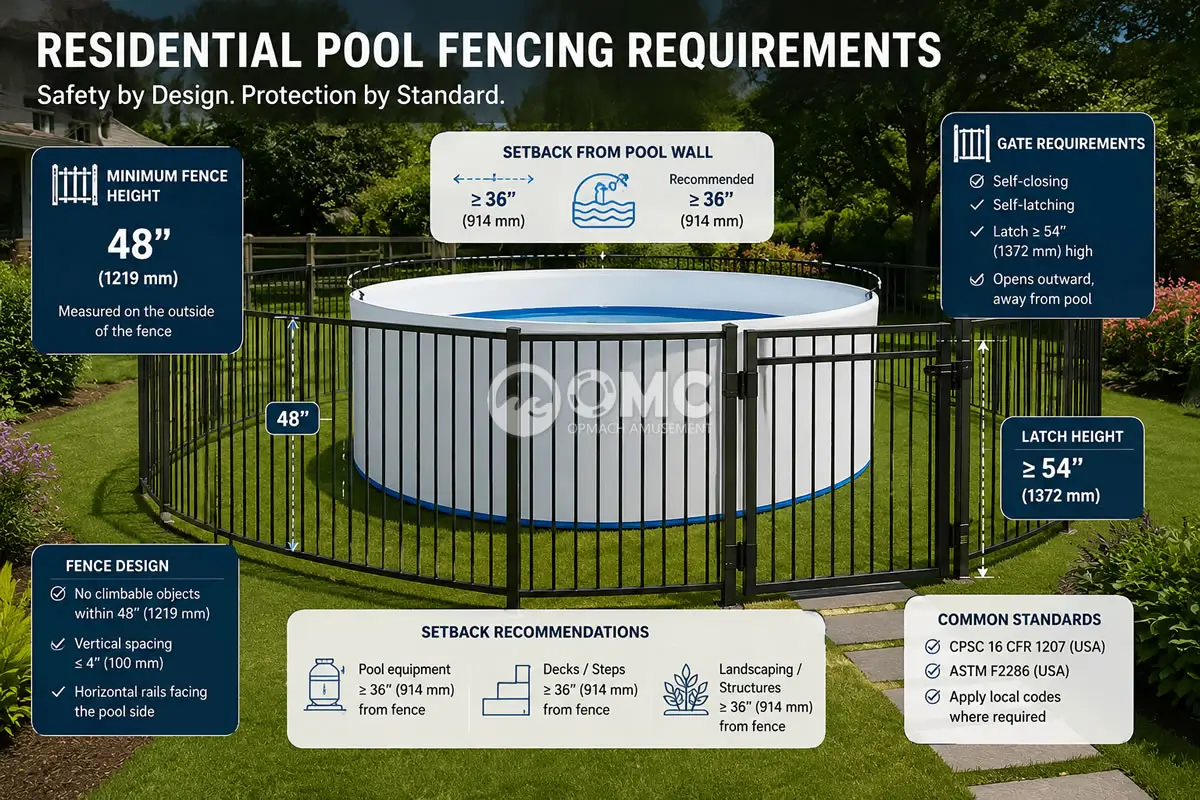
The law treats temporary pools like permanent ones. The Virginia Graeme Baker Act (VGBA) applies to any residential pool deeper than 24 inches. Many cities require a permit for pools holding 36″ or more.
Child safety & access control
Four‑sided fencing with self‑closing, self‑latching gates is the gold standard. Fence height must be at least 48 inches. The pool itself counts as a barrier only if its walls are ≥48″ and not climbable. Alarms and covers are supplements, not substitutes.
Local regulations
“All swimming pools that can hold 36 inches or more of water require an enclosure permit – including temporary pools.” Check your city’s building department. Ignoring this can mean fines, removal orders, or liability lawsuits.
Slip prevention
Put non‑slip mats or textured coating around entry/exit points. Keep the area free of algae and standing water. For pools over 70cm deep, install handrails.
Emergency access
Keep a clear path to the pool. Have rescue equipment (life ring, shepherd’s hook) within reach. Post emergency numbers. Make sure everyone who uses the pool knows basic water safety.
Insurance & liability for commercial
If you run a hotel, rental, or wellness center, carry liability insurance that covers inflatable pools. Document your compliance with all safety codes. A single incident can shut you down.
Setup Scenarios by Buyer Type
Different users need different approaches. Here’s how the install changes based on who you are.
Homeowners – seasonal family use
Keep it simple. Popular sizes: 3–4.5m. Use the pool for 3–4 months a year. Focus on good ground prep, basic filtration, and safe storage in winter.
Airbnb / vacation rental owners
You need durable materials and easy maintenance. Consider custom branding (logo on the pool) — it adds a premium feel. Meet commercial safety standards. Educate guests with a simple rule card.
Resorts & boutique hotels
Quick‑deploy pools work great for beachfront, rooftop, or events. ROI is real: a $1,400 pool can generate $18,000–$32,000 extra revenue at a bar. Get professional installers; use commercial‑grade materials.
Event rental companies
Frequent setup/teardown means you need rapid inflation systems and rugged fabrics. Rectangular pools (e.g., 20ft × 10ft) are versatile for parties. Invest in multiple ground sheets and cleaning gear.
Wellness centers / cold plunge
Dual‑use – cold plunge in winter, warm pool in summer. Drop‑stitch handles temperature changes well. You’ll need insulated ground sheets and a commercial chiller/heater. Hire pros for installation and plumbing.
Cost Factors – The Full Picture
The pool price is just the start. Budget for ground prep, filtration, water, chemicals, and labor. Here’s a realistic breakdown.
- Site prep: DIY levelling $0–200; professional grading $500–2,000; concrete pad $1,500–5,000.
- Filter pump: Residential $100–400; commercial $500–2,000; cartridges $20–50/season.
- Water fill: ~8,800 litres for a 4m pool – cost $5–50 per fill.
- Maintenance labor: Residential 1–2 hrs/week; commercial 5–10 hrs/week or $200–500/month for a service contract.
- Long‑term ROI: In‑ground pool: $35k–$120k, 3–6 months install. Drop‑stitch pool: 70% of the guest experience at 5% of the cost. Replacement cycle 3–7 years. Commercial operators often break even in the first season.
| Category | Residential | Commercial |
|---|---|---|
| Ground prep | $0–500 | $500–2,000+ |
| Filtration | $100–400 | $500–2,000+ |
| Water treatment | $50–200/season | $200–500/season |
| Seasonal maintenance | $100–300/season | $500–2,000/season |
| Install labor | DIY (low) | $500–1,500 |
Frequently Asked Questions
What yard size do I need?
Pool footprint + 1.5m clearance all sides. For a 4m round pool, that’s a 7m × 7m area. Also check local setback rules.
Most popular residential size?
3.5–4.5m diameter (or equivalent rectangular). Fits 4–6 people and works in most yards.
Can I put it on grass?
Yes, but you must level it, clear debris, and use a protective mat. The grass will die underneath – that’s normal.
Do I need concrete?
No – compacted earth is fine. Concrete is “excellent” but not required. Avoid gravel, sand, asphalt, or chemically treated soil.
How long to set up?
30–60 min for inflation + hook‑up; water fill takes 1–6 hours. Ground prep adds 1–4 hours.
How many people to install?
At least 2 people for pools under 4.5m; 3–4 for 6m+ pools.
Can I move it once filled?
Absolutely not. A filled pool weighs tons – moving it will ruin the structure and endanger everyone.
What tools do I need?
High‑volume pump with gauge, tape measure, stakes, ground sheet, screwdriver, and a wrench for filter fittings.
Is a filter really necessary?
Yes – for any pool used more than 2 days. It keeps water clear and reduces chemical use. Commercial pools must have one.
How often to check PSI?
Weekly during the season, and again after big temperature swings. Keep it within the manual’s range.
Can the pool stay out all year?
Not in freezing climates – ice expansion destroys the material. In mild areas, you can leave it with proper winterisation (cover, draining, etc.).
Winter storage tips?
Drain fully, clean and dry, deflate, fold without creasing, and store above freezing in a dry space. Avoid folding in the same creases repeatedly.
Are these pools good for resorts?
Yes – commercial‑grade versions are used in hotels and beach clubs. They need professional install, strong materials, and rigorous maintenance.
Can I brand the pool?
Yes – manufacturers offer custom printing, logos, and colours with minimum order quantities. Popular for resorts and rental companies.
What support do manufacturers offer?
Manuals, video guides, on‑site training (for large orders), and technical help. Some provide certification checklists.
What warranty issues come from bad setup?
Most common: uneven ground (voids warranty), over‑inflation, valve misuse, and no ground sheet. Read the fine print – setup errors are almost never covered.
This guide draws from industry standards, manufacturer manuals, and field experience. Always consult your specific product manual. For questions, contact your supplier or a certified installer.
🌟 OMC Amusement makes high-pressure inflatables for global B2B brands. Buy direct from our factory to get wholesale pricing with zero middleman fees. We deliver most custom orders in 15 to 40 days with a proven 99.8% quality pass rate.
💼 Our Core Product Categories
- Drop-Stitch Lines: Heavy ice bath tubs, drop stitch swimming pools, inflatable yachts, docks, and floating platforms.
- Water Park Lines: Large lake parks, floating obstacle courses, and inflatable castles.
📬 Get a Factory-Direct Quote Within 24 Hours
Ready to update your inventory or build a custom pool? Contact our engineering desk right now for a fast reply.
- 📧 Email: info@omcplay.com
- 📲 WhatsApp / Tel: +86 15638116754
Leave your information and a professional consultant will reply.
- Previous article: Back To List
- Next article: Outdoor Pool Demand Growth: What Buyers Need to Know Before Investing in the Outdoor Leisure Market